Use Notion as a CMS backend for Wordpess via n8n workflow

Automating Your Notion-to-WordPress Publishing Workflow with n8n
Managing a blog often means juggling multiple platforms—writing in a clean editor, hosting images, keeping track of metadata, and finally publishing to WordPress. What if you could centralize all of that in Notion (your day-to-day knowledge base) and then hit a single button to have your content automatically formatted, images uploaded, FAQs generated, and published to WordPress? That’s exactly what we’ve built using n8n. In this guide, you’ll learn how to replicate a fully automated Notion→WordPress pipeline—no coding required beyond configuring n8n nodes. We’ll cover:
- Why use Notion as your CMS for blogging
- Overview of the n8n workflow
- Step-by-step breakdown of each node
- Tips for image handling, category management, and AI-powered FAQ schema
- Final thoughts and best practices
Why Use Notion as a CMS for Your WordPress Blog?
-
One Editor to Rule Them All
Notion serves as a daily hub for documentation, team collaboration, and personal note-taking. By treating your Notion pages as “draft blog posts,” you eliminate the need to log into WordPress’s block editor (or any page builder) just to make text changes. Writing and formatting happen in Notion, which many find cleaner and more intuitive than WordPress’s interface.
-
Instant Version History & Collaboration
Any edits you make in Notion are versioned automatically. Fellow team members can comment, suggest, or directly edit without worrying about “breaking” your blog layout. Once finalized, just flip a status toggle and let n8n handle the rest.
-
Consistent Content Formatting
Notion’s Markdown‐style formatting ensures that headings, lists, code blocks, images, and links remain consistent. When you convert Notion content to Markdown and then to HTML, the output is tidy and predictable—no missing tags or stray shortcodes.
-
Avoiding Login Hurdles
If you keep Notion open all day, updating blog copy is as simple as typing in your central workspace. No more “I forgot my WordPress password” or wrestling with plugin conflicts. Create content where you already live mentally, then push it live with one click.
Overview of the n8n Workflow
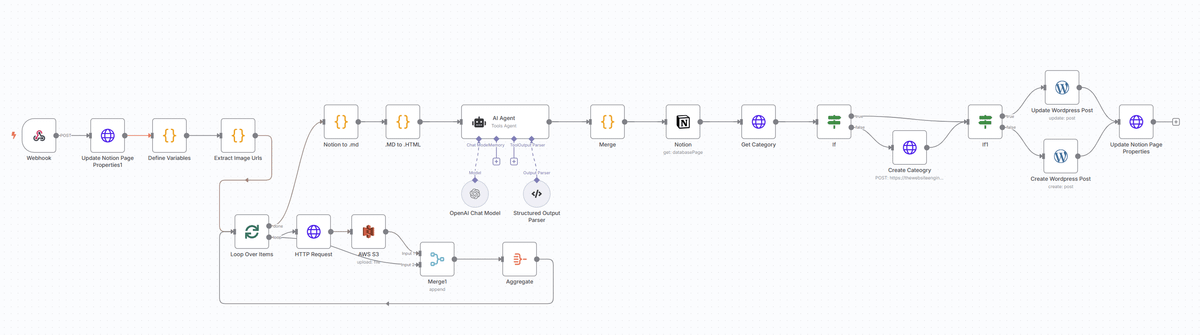
Below is a high-level diagram of the workflow steps (as represented in n8n). Each numbered item corresponds to a node or group of nodes in the workflow:
- Notion “Update Status” Button (Webhook Trigger)
- Update Notion Page Status → “Processing”
- Define Variables (API Keys, Base URLs, etc.)
- Extract Image URLs from Notion Markdown
- Loop Over Each Image URL
- a. Call External Image Worker (Resize/Compress)
- b. Upload to S3
- Aggregate Original & Uploaded Image URLs
- Convert Notion Page to Markdown
- Replace Notion Image URLs with Signed/Resized URLs
- Convert Markdown to HTML
- Use AI Agent to Extract FAQs (Schema-Ready JSON-LD)
- Merge Outputs (HTML + FAQ JSON-LD)
- Fetch (or Create) WordPress Category
- If WP Post ID Exists → Update Post; Else → Create Post
- Update Notion Page with WP Post ID & “Published” Status
Once configured, authors simply set a Status property in Notion to “Publish” and click the automation button. n8n handles everything else: image processing, HTML conversion, AI-powered FAQ insertion, category management, post creation or update, and finally reflecting the new WordPress Post ID back in Notion.
1. Notion “Update Status” Button (Webhook Trigger)
In your Notion database (where you track blog drafts), create a Status property (e.g., “Draft,” “Processing,” “Published”). Next to that, add a “Update Status” button (using a Notion button type). Configure the button to send a Webhook request to an n8n webhook URL whenever it’s clicked.
When you click that button, Notion fires off a JSON payload containing your page’s ID and its current property values (including Title, Category, and any existing “WP Post ID”).
n8n Node:
- Webhook (type: Webhook)
- Listens for incoming POST requests from Notion.
- Captures
body.data.id(the Notion page ID) andbody.data.properties(all fields).
2. Update Notion Page Status → “Processing”
Immediately after the Webhook node, use an HTTP Request node in n8n to set your Notion page’s Status property to “Processing”. This serves two purposes:
- Gives a visual indicator in Notion that the publishing pipeline has begun.
- Prevents accidental repeated triggers while n8n is working.
n8n Node:
- HTTP Request (PATCH to Notion)
-
URL:
https://api.notion.com/v1/pages/{{webhook.data.id}} -
Method: PATCH
-
Body (JSON):
{ "properties": { "Status": { "type": "status", "status": { "name": "Processing" } } } } -
Requires a Notion integration token with read/write permissions to your database.
-
3. Define Variables (API Keys, Base URLs, etc.)
Next, we need to make credentials available to downstream nodes. In n8n, we use a Code node (type: JavaScript) to attach environment variables (stored as n8n credentials or workflow variables) to each incoming item. Typical variables:
NOTION_SECRET– Notion integration token (read/write).WORDPRESS_URL– Base URL of your WordPress site’s REST API (e.g.,https://example.com/wp-json/wp/v2).S3_BUCKET– The S3 bucket name (e.g.,"my-blog-images").IMG_RESIZER_WORKFLOW_ID– (Optional) Another n8n workflow ID that handles image resizing/compression.
n8n Node:
-
Code (Define Variables)
return [ { json: { notion_secret: $credentials.NotionToken, wordpress_url: "https://your-site.com/wp-json/wp/v2", s3_bucket: "my-blog-images", img_resizer_workflow_id: "abcd1234" } } ];- These values can also be pulled from n8n Credentials instead of hard-coding.
4. Extract Image URLs from Notion Markdown
Before converting the Notion page to Markdown, we need to know which images are embedded, so we can push them through our image service and eventually upload them to S3.
First, call the Notion API to retrieve the page’s content in blocks, convert to Markdown, and search for any  patterns.
n8n Nodes:
-
Notion (Get Page Content)
- Operation:
get databasePageorget page - Page ID:
{{ webhook.data.id }}
- Operation:
-
Code (Extract Image URLs)
const { NotionToMarkdown } = require("notion-to-md"); const notion = new NotionToMarkdown({ notionClient: new NotionClient({ auth: $json.notion_secret }) }); return notion.pageToMarkdown($json.page_id).then(mdBlocks => { const mdString = notion.toMarkdownString(mdBlocks).parent; const regex = /!\[.*?\]\((.*?)\)/g; const matches = [...mdString.matchAll(regex)]; return matches.map(m => ({ json: { url: m[1] } })); });- Output: An array of JSON items, each containing
{"url": "<original_image_url>"}.
- Output: An array of JSON items, each containing
5. Loop Over Each Image URL
Now that we have a list of image URLs, we can process them one by one. Use SplitInBatches to iterate over each URL, send it to an image resizing/compression workflow, and then upload the processed image to S3.
n8n Nodes:
- SplitInBatches (batchSize: 1)
- Splits the array of
{ url: ... }items so each URL is processed individually.
- Splits the array of
- Execute Workflow (Image Resizer)
- Points to a separate n8n workflow (specified by
img_resizer_workflow_id) that:- Accepts an image URL
- Downloads it
- Performs resizing/compression (e.g., using Sharp or an external microservice)
- Returns a new, compressed image file or public URL (optional).
- Input Mapping:
{ imgUrl: {{ $json.url }} }.
- Points to a separate n8n workflow (specified by
- AWS S3 (Upload)
- Bucket Name:
{{ $json.s3_bucket }} - File Name: A timestamp + original filename extension (e.g.,
Date.now() + ".jpg"). - File Content: Pull from the resizer’s output (binary data or remote URL).
- Returns: A JSON object with
Location(public S3 URL) and other metadata.
- Bucket Name:
After uploading, each batch returns two pieces of data:
originalUrl– the Notion image URLuploadedUrl– the S3 URL
6. Aggregate Original & Uploaded Image URLs
Once the loop is done, use an Aggregate node to collect all the { originalUrl, uploadedUrl } pairs into a single array. This allows you to update your Markdown all at once in a subsequent step.
n8n Node:
- Aggregate (Group by nothing, just collect fields)
- Field to Aggregate 1:
- Field to aggregate:
Location(from S3 node) → rename asuploadedUrl
- Field to aggregate:
- Field to Aggregate 2:
- Field to aggregate:
url(from Extract Image URLs) → rename asoriginalUrl
- Field to aggregate:
- Result: A single JSON with two arrays (e.g.,
originalUrl: [ ... ]anduploadedUrl: [ ... ]).
- Field to Aggregate 1:
7. Convert Notion Page to Markdown
Simultaneously (or in parallel), you need the full page content in Markdown (including text, headings, links, code blocks, etc.). Use Notion-to-Markdown to fetch and convert:
n8n Nodes:
-
Notion (Get Page Content)
- Same call as in Step 4.
-
Code (Notion to .md)
const { NotionToMarkdown } = require("notion-to-md");
const notionClient = new NotionClient({ auth: $json.notion_secret });
const n2m = new NotionToMarkdown({ notionClient });
return n2m.pageToMarkdown($json.page_id)
  .then(mdBlocks => {
    const markdownString = n2m.toMarkdownString(mdBlocks).parent;
    return [{ json: { notion_md: markdownString } }];
  });
8. Replace Notion Image URLs with Signed/Resized URLs
Once you have the raw Markdown (notion_md) and the two arrays (originalUrl[], uploadedUrl[]), use a Code node to find every  occurrence and swap it with a signed or resized S3 URL.
n8n Node:
-
Code (Replace Image URLs)
let md = $json.notion_md; const originals = $json.originalUrl; // e.g., ["https://s3.us-east-1.amazonaws.com/..."] const uploads = $json.uploadedUrl; // e.g., ["https://cdn.mybucket.com/..."] for (let i = 0; i < originals.length; i++) { // Escape filenames and build a regex that matches the entire markdown image syntax const orig = originals[i].replace(/[.*+?^${}()|[\]\\]/g, "\\$&"); const regex = new RegExp(`(!\\[[^\\]]*\\]\\()${orig}([^)]*\\))`, "g"); // Optionally: generate signed URL if using imgproxy; here we assume direct S3 public URLs const replacedUrl = uploads[i]; md = md.replace(regex, (match, p1, p2) => `${p1}${replacedUrl}${p2}`); } return [{ json: { updated_md: md } }];- Now
updated_mdcontains Markdown where every image link points to your optimized S3 object.
- Now
9. Convert Markdown to HTML
With a clean Markdown string that references your S3 images, convert it to HTML so WordPress can ingest it directly. We use a Markdown-to-HTML library (e.g., markdown-it).
n8n Node:
-
Code (Markdown → HTML)
const MarkdownIt = require("markdown-it");
const md = new MarkdownIt({ html: true, linkify: true });
const htmlContent = md.render($json.updated_md);
return [{ json: { notion_html: htmlContent } }];
10. Use AI Agent to Extract FAQs (Schema-Ready JSON-LD)
To improve SEO, we automatically generate a FAQ schema block at the bottom of each post. An AI Agent node can parse the HTML or Markdown content and output structured FAQ JSON-LD. In n8n, this is done using an OpenAI-backed agent:
n8n Nodes:
- AI Agent (Define Prompt)
-
Prompt:
Analyse the provided HTML content and extract five frequently asked questions (FAQs) based on the text. Output the result as a JSON-LD FAQ schema, for example: { "@context": "https://schema.org", "@type": "FAQPage", "mainEntity": [ { "@type": "Question", "name": "Question 1?", "acceptedAnswer": { "@type": "Answer", "text": "Answer text..." } }, … ] } -
Input:
$json.notion_html -
Output: A properly structured JSON object.
-
- Structured Output Parser
- Ensures the agent’s output matches the JSON-LD format exactly.
- Merge
- Combine the
notion_html(raw HTML) and the base64-encoded FAQ JSON-LD (to avoid confusion with special characters) into a single JSON so that the final WordPress post content can append ashortcode or embed directly.
- Combine the
11. Merge Outputs (HTML + FAQ JSON-LD)
After converting to HTML and generating FAQ JSON:
n8n Node:
-
Code (Merge HTML & FAQ)
const html = $node[".MD to .HTML"].json.notion_html; const faqSchema = $node["AI Agent"].json.output; // Already validated by structured parser const encodedFaq = Buffer.from(JSON.stringify(faqSchema)).toString("base64"); return [{ json: { notion_html: html, faq_ld_base64: encodedFaq } }]; -
This gives you:
notion_html: full article HTMLfaq_ld_base64: the FAQ schema (base64) so you can later decode it in WordPress or use a shortcode plugin such as.
12. Fetch (or Create) WordPress Category
Most posts belong to a category. In Notion, you might have a “Category” property. We now:
-
Query WP Categories via REST:
GET https://your-site.com/wp-json/wp/v2/categories?search={{ $json.category_name }} -
If Category Exists: capture its
id. -
If Category Doesn’t Exist:
POST https://your-site.com/wp-json/wp/v2/categories
{
  "name": "{{ $json.category_name }}"
}
to create it, then capture the returned
id.
n8n Nodes:
- HTTP Request (Get Category)
- URL:
{{wordpress_url}}/categories?search={{ $json.category_name }} - On Error: Continue (so that a 404 or empty response proceeds to category creation).
- URL:
- IF Node (Category Found?)
- Condition: Check if
response[0].idexists. If yes, use that ID. If no:
- Condition: Check if
- HTTP Request (Create Category)
- URL:
{{wordpress_url}}/categories - Body:
{ "name": "{{ $json.category_name }}" } - Capture the newly created
id.
- URL:
13. Create or Update WordPress Post
Now that we have:
notion_html(body content)faq_ld_base64(FAQ schema)category_id- Notion page’s “WP Post ID” property (if this is a re-publish)
we decide whether to create a brand-new post (if there’s no existing WP Post ID) or update an existing post (if WP Post ID is present). The WordPress REST API makes this straightforward:
-
Create:
POST https://your-site.com/wp-json/wp/v2/posts { "title": "{{ page_title_from_notion }}", "content": "{{ notion_html }}\n\n", "status": "{{ status }}", // e.g., "publish" "categories": [ category_id ] } -
Update:
PUT https://your-site.com/wp-json/wp/v2/posts/{{ existing_post_id }}
{
  "content": "{{ notion_html }}\n\n",
  "categories": [ category_id ]
}
n8n Nodes:
- IF Node (Post Exists?)
- Condition: Does Notion properties contain a numeric “WP Post ID”?
- If No (first time publishing):
- HTTP Request (Create Post) (or use n8n’s built-in WordPress node)
- If Yes (re-publish/update):
- HTTP Request (Update Post)
- Store Response → New Post ID
- After creating a post, WordPress returns a JSON with the new
id.
- After creating a post, WordPress returns a JSON with the new
14. Update Notion Page with WP Post ID & “Published” Status
Finally, take the WordPress response’s id and write it back to the Notion page so you can track which posts have been published. Then change the Notion Status to “Published” (or something similar).
n8n Node:
- HTTP Request (PATCH Notion Page)
-
URL:
https://api.notion.com/v1/pages/{{ webhook.data.id }} -
Body:
{ "properties": { "WP Post ID": { "type": "number", "number": {{wordpress_response.id}} }, "Status": { "type": "status", "status": { "name": "Published" } } } } -
This ties a Notion page to its WordPress counterpart, making it easy to detect future edits (and update WordPress accordingly).
-
Putting It All Together: A Textual Workflow Summary
- Author writes or edits a blog post in Notion—using headings, lists, images, and normal Notion formatting.
- The author sets the “Status” property to “Publish” and clicks the “Update Status” button.
- Notion sends a Webhook to n8n with the page’s ID and all property values.
- n8n’s first action: mark Notion Status = “Processing” (to show it’s in progress).
- Define Variables (Notion token, WordPress URL, S3 bucket, etc.).
- Extract Image URLs from Notion’s Markdown → Loop each image → Resize/Compress → Upload to S3 → Collect original/uploaded URLs.
- Convert Notion page to raw Markdown.
- Replace all image URLs in Markdown with your S3 public URLs (optionally a signed link) so your HTML always pulls from a fast CDN.
- Convert updated Markdown to HTML using a Markdown-to-HTML library.
- Use AI to parse the HTML and produce a FAQ JSON-LD (to boost SEO).
- Merge the pure HTML + FAQ schema → Final “content” ready for WordPress.
- Check/Set Category in WordPress: if it exists, get its ID; otherwise, create it and retrieve the new ID.
- Create or Update a WordPress post via the REST API:
- Title from Notion page property
- Content = deftly formatted HTML +
shortcode or direct JSON-LD embed - Assign category.
- Capture the WP Post ID returned by WordPress, then update the Notion page with that ID and set Status to “Published.”
That’s it—no more copying and pasting, no more downloading images or manually uploading. By living in Notion for writing and letting n8n do the heavy lifting, you create a seamless “write once, publish everywhere” experience.
Benefits of This Approach
- Single Source of Truth (Notion)
- All content, editorial comments, and version history remain in Notion.
- Writers don’t have to learn the intricacies of a WordPress block editor.
- Automated Image Handling
- Any image embedded in a Notion page automatically gets compressed/resized and uploaded to S3.
- No broken image links or missing alt-text: Notion’s Markdown conversion retains alt descriptions, which can then be included in
<img alt="…">tags. - Using S3 (or a CDN) ensures that your blog loads quickly, reducing bounce rates.
- AI-Powered FAQ Schema
- Embedding FAQ JSON-LD directly into your post can boost SEO by generating rich results on Google.
- Instead of manually writing a “Frequently Asked Questions” section, the AI agent analyses your content and extracts likely questions and answers—minimizing editorial overhead.
- Category Self-Management
- By querying WordPress categories and creating new ones as needed, you avoid “uncategorized” posts.
- You ensure that every post is immediately visible under the correct category without manual intervention.
- One-Click Republish
- If you need to update an already-published post (text changes, new images, or revised FAQs), simply update the Notion page, click “Update Status,” and n8n will PUT the new content to the same WordPress post ID.
- No more copy/paste of HTML or manual “Update” clicks in WordPress.
Tips & Best Practices
-
Store Credentials Securely
Always use n8n’s built-in Credentials for Notion tokens, WordPress API keys, AWS S3 access, and any other sensitive data. Avoid hard-coding secrets in your workflow.
-
Limit Image Size & Dimensions
In your image-resizer workflow, choose sensible maximum widths (e.g., 1200px). Oversized images slow down page loads and can harm SEO. You can also generate multiple sizes and let WordPress serve the most appropriate
srcset. -
Custom Domain & SSL
Host n8n under HTTPS (e.g., https://automation.yourdomain.com). Notion’s “Send web request” button must target an HTTPS endpoint to avoid mixed-content issues.
-
HTML Sanitization
If you allow complex styling in Notion (e.g., inline color changes), verify that your Markdown→HTML conversion strips any unsupported or potentially unsafe tags. For maximum safety, consider using a library option like
markdown-it-sanitizer. -
Testing & Rollback
Before switching a live site to 100% automated workflows, test thoroughly:
- Create a “Test” Notion Database & a “Staging” WordPress environment.
- Kick off the entire pipeline on a draft post to ensure categories are created correctly, images land in S3, HTML renders as expected, and FAQs are valid JSON.
- Once green, flip your production workflow live.
-
Monitoring & Error Handling
n8n has built-in error-workflow options. If, for example, the WordPress REST API rejects a category name (due to invalid characters) or your S3 upload fails, configure n8n’s Retry or Error branches. You can automatically send Slack or email notifications if any step errors out, ensuring you fix the problem quickly.
Example Blog Post Outline
Below is an outline of how a typical post might look when authored in Notion and then rendered on WordPress via this pipeline:
-
Post Title (Notion page title)
-
Featured Image (First image in Notion page; extracted & uploaded to S3, then set as featured image via a separate REST call or shortcode)
-
Introduction & Body (Converted directly from Notion formatting to HTML)
-
Subheadings & Code Blocks (Remain intact, since Markdown→HTML handles them natively)
-
Embedded Images
-
AI-Generated FAQs (At the bottom):
html CopyEdit <script type="application/ld+json"> { "@context": "https://schema.org", "@type": "FAQPage", "mainEntity": [ { "@type": "Question", "name": "How do I trigger the Notion→WordPress workflow?", "acceptedAnswer": { "@type": "Answer", "text": "Set the Status property to 'Publish' and click the 'Update Status' button in Notion. n8n does the rest." } }, … (4 more questions) ] } </script> -
Published Date & Meta (Handled automatically by WordPress)
Conclusion
By leveraging Notion as your primary writing environment and n8n as the automation engine, you can significantly cut down on manual steps, eliminate the need to juggle multiple editors, and ensure consistent formatting across your site. Key takeaways:
- Notion as a CMS brings a cleaner, more collaborative writing experience.
- n8n orchestrates everything: from image optimization and S3 uploads to AI-powered FAQ generation and WordPress publishing.
- One-Click Publishing frees you from copy/paste headaches and allows you to focus on the craft of writing rather than technical details.
- SEO Benefits come naturally when you embed structured FAQ schema, host images on a fast CDN, and maintain semantic HTML.
Ready to give it a try? Clone this workflow in n8n, connect your Notion tokens and WordPress credentials, and watch your next Notion page appear live on your blog—fully formatted, SEO-enhanced, and interview-ready in just seconds.
Frequently Asked Questions (FAQs)
-
Can I publish multiple Notion pages at once?
Yes. You can duplicate this workflow or chain multiple “Update Status” buttons to publish in batches. However, each Notion page needs its own trigger. For bulk publishing, consider having a Notion view filter “Status = Ready to Publish” and loop through each page via a scheduled n8n workflow.
-
How do I handle featured images separately from inline images?
If you want a distinct “Featured Image,” create a Notion property (e.g., “Featured Image URL”). In the n8n workflow, detect that property, process it first (resize + upload to S3), then include its resulting URL in the WordPress REST call under
"featured_media": <attachment_id>(via a prior media upload request). -
What if I need custom metadata (e.g., SEO title, meta description)?
Add extra properties in Notion (e.g., “SEO Title,” “Meta Description”). After converting your content, include those properties in the WordPress REST payload under
meta: { “yoast_title”: "...", “yoast_metadesc”: "..." }, assuming you have an SEO plugin that exposes custom REST fields. -
How can I preview the HTML before it’s live on WordPress?
Insert a “Preview” toggle in your Notion workflow that sets Status = “Draft→Preview.” In n8n, branch off to push content to a private or password-protected staging instance of WordPress. Once approved, you can re-click “Publish” to push to your live site.
-
What if my Notion page is very large—will the AI FAQ generator time out?
The default OpenAI request limit is a few thousand tokens. For extremely long posts, paginate the HTML (e.g., send only the first X characters) or truncate to headings and paragraphs. You can also skip the AI step for very large articles or write FAQs manually in Notion and simply embed them as raw JSON.
With this setup, you’re no longer fighting two or three disparate content platforms. Keep writing freely in Notion, and let n8n do the heavy lifting—image optimization, AI-driven enhancements, and WordPress publishing—so you can focus on crafting great content.
